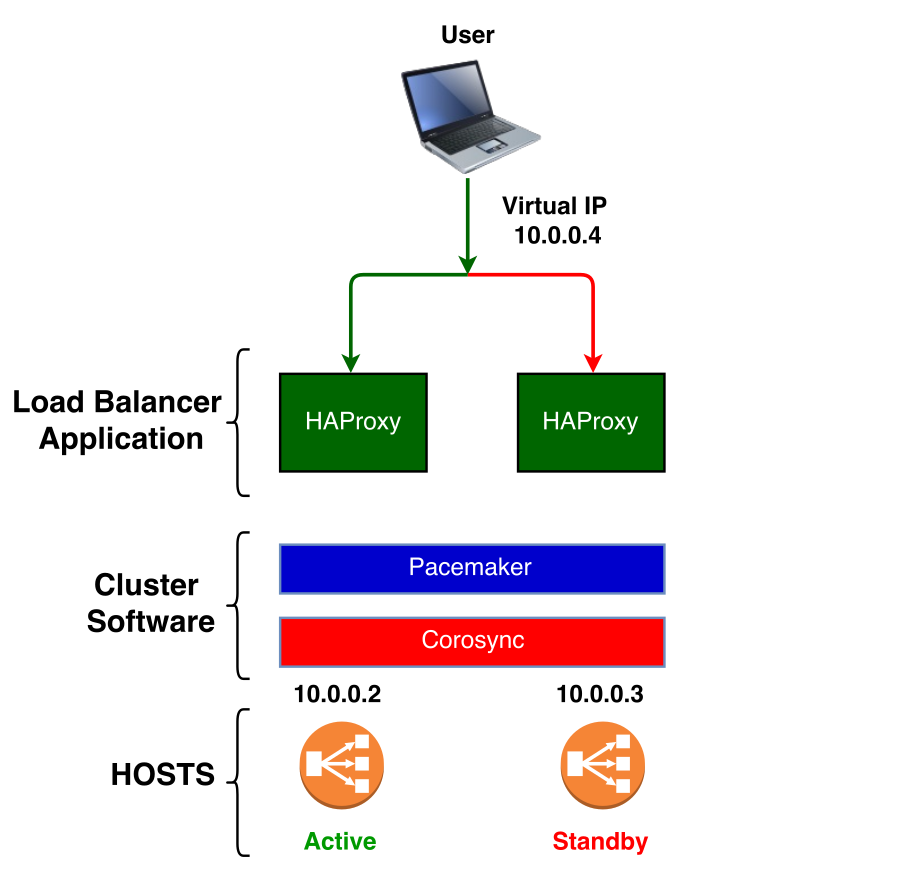
In the modern world where everyone wants to be always connected, High Availability became one of the most important feature for a system. For example if you are running a system you don't want a failure in one piece of your architecture impacts the whole system. You have to make all the components of your architecture high available. In this post we will present how, in the Middleware section of Dabatase group at CERN, we setup a High Availability HAProxy based on CentOS 7. We use a Load Balancer to spread the load across different Kubernetes Clusters and to isolate clusters that are not working, but since it is the only point of access to our applications we had to assure that a failure would not compromise the whole architecture. The aim of this post is to show how enable pacemaker to manager HAProxy lyfe-cycle and react to a failure without impacting the users. In the below picture you can see what will be the final architecture.

Prerequisites
In order to be able to configure it we need to perform the following steps :
- Install and configure CentOS machines with packages needed.
- Set up the cluster
- Set up fencing
- Create virtual ip resources
- Create HAProxy resources
Pacemaker and Corosysnc
Before going through all the steps let's have a look at two key components of a HA Cluster:
Pacemaker is an open source cluster resource manager that takes care of the life-cycle of deployed software. It is in charge of detecting and recovering from node and resource failures using the messaging and membership capabilities provided by Corosync.
The last (also open source) provides :
- a quorum system
- a messaging layer for clusters
Install and configure CentOS machines
Supposing that we have two physical machines HOST-1 and HOST-2 with CentOS 7.
The HOST-1 has the ip :
- 10.0.0.2
the HOST-2 has :
- 10.0.0.3
and a Virtual IP : 10.0.0.4.
Install all packages needed in these boxes:
$ yum -y install pacemaker corosync fence-agents-all fence-agents-virsh fence-virt pacemaker-remote
$ pcs fence-virtd resource-agents fence-virtd-libvirt fence-virtd-multicast haproxy
Besides pacemaker, corosync and haproxy we install also pcs, a configuration tool for pacemaker and corosync. All the other fence-* packages are a set of scripts to remotelly manage power for cluster devices.
Setup Cluster
For all nodes :
$ systemclt enable pcsd corosync pacemaker
$ systemctl start pcsd
Set up the password of the cluster :
$ echo $PASSWORD | passwd --stdin hacluster
Authenticate and setup the cluster (you can run them on one node)
$ pcs cluster auth HOST-1 HOST-2 -u hacluster -p PASSWORD --force
$ pcs cluster setup --start --name name_cluster HOST-1 HOST-2
Since it is a 2 nodes cluster we don't need to setup a quorum, it means that the cluster will work even if one of them is down :
$ pcs property set no-quorum-policy=ignore
Setup Fencing
Fencing is the process of isolating the machines that are in a "wrong state" or malfunctioning. This help us to protect the other members of cluster. To do so you need to have access to have an administrator account in IPMI interface.
$ pcs stonith create HOST-1-fencing fence_ipmilan pcmk_host_list="HOST-1,HOST-2" ipaddr="HOST-1-ipmi" login="clusterFence" passwd="ADMIN_PASSWD" op monitor interval=10s
$ pcs stonith create HOST-2-fencing fence_ipmilan pcmk_host_list="HOST-1,HOST-2" ipaddr="HOST-2-ipmi" login="clusterFence" passwd="ADMIN_PASSWD" op monitor interval=10s
Now we can add a location contraints to force the stonith resources to be assign to a specific node :
$ pcs constraint location HOST-1-fencing prefers HOST-1=INFINITY
$ pcs constraint location HOST-2-fencing prefers HOST-2=INFINITY
Create virtual ip resource
The next step it to create the Virtual IP that will be shared among the cluster
$ pcs resource create VIP ocf:heartbeat:IPaddr2 ip=10.0.0.4 cidr_netmask=25 op monitor interval=1s
Create HAProxy resources
Download the OCF agent from github.
Move above file to the directory where the ocf resource are stored (on both nodes) :
$ cd /usr/lib/ocf/resource.d/heartbeat
$ chmod +x haproxy
Now we can create the HAProxy resource:
$ pcs resource create haproxy ocf:heartbeat:haproxy binpath=/usr/sbin/haproxy conffile=/etc/haproxy/haproxy.cfg op monitor interval=10s
We need also to ensure that HAProxy and the Virtual IP are running on just one node at a time. To do this we need to group the two resources.
$ pcs resource group add HAproxyGroup VIP haproxy
$ pcs constraint order VIP then haproxy
And now we can enable the stonith (keep disabled just for dev environment) :
$ pcs property set stonith-enable=true
Conclusion
This setup was done on physical machines for limitation on CERN network but nothing blocks you to try also with Virtual Machines. In this case you will need to perform two more steps :
- define another OCF resource to reboot the VMs, calling the API of the cloud provider or hypervisor
- define an OCF agent to move the Virtual IP from a VM to another.
You should also keep in mind that it is not a system that works only with HAProxy, you could replace HAProxy with any service of your choice (database, web server, etc.).
