As you may have read in the news, CERN is testing some Oracle Cloud services. When a large organisation is using the Cloud Credits, there's a need to control the service resources. This requires automation and then the GUI interface from the Cloud portal is not sufficient. We can control the Oracle Cloud Infrastructure through the REST API, OCI CLI, OCI SDKs, and all those methods require a RSA key for sign-in and some OCI (Oracle Cloud Identifier) to identify the user, the tenant, the compartment, the service,... We also need to know the URL for our Region (the endpoint) and the version of the API. In order to explain how it works, here is a demo I've run on my own OCI tenant (thanks to the Oracle ACE program providing credits to ACE Directors). I've run this example on Windows 10 WSL (the Windows Linux Subsystem which is actually a Ubuntu distribution) in order to check if all components are available from there.
Generate RSA key
I create a directory to store my private key:
root@Franck:~# mkdir ~/.oci
root@Franck:~# openssl genpkey -out ~/.oci/oci_api_key.pem -algorithm RSA -pkeyopt rsa_keygen_bits:2048
..........+++
............................+++
I have generated a 2048 bits key in PEM format as this is what is required by the Oracle Cloud. You will not be able to upload a smaller key.
Here it is:
root@Franck:~# ls -l ~/.oci/oci_api_key.pem
-rw------- 1 root root 1704 Sep 15 19:20 ~/.oci/oci_api_key.pem

root@Franck:~# cat ~/.oci/oci_api_key.pem
-----BEGIN PRIVATE KEY-----
MIIEvgIBADANBgkqhkiG9w0BAQEFAASCBKgwggSkAgEAAoIBAQDh+pxDWZ1QYxet
0KMyBHv+99EAvGzDS8KkyH5HiWF7n8U6wx9+ICgIiCaEVZVpvfsxmrM+wm/1kalr
rZ+4u70n0m0u5+d474+w4r3h0u53+cl0ud+53rv1c3+l683kpNKIJqldx201iX01
ay++n0+hum4n+l4b0r+h3r3+vTKNAgMBAAECfwNrdmiqT9R7RqTwwzhiIU03kNrR
cy+b3c4u53+7h3+db4+m4k35+m1574k35+y0u+kn0w+fBmpaaep6cU2DLpYCele2
l6jEUSOKb4mwWlBIu66+K3OSOpEjYMnmmfEcaqXQZUAMeQPhm0Lt0rI58WWdwAYP
eUajiUoEzWOknGLbuOzOcm5ittfky9iT7o+TKKaYqVUu2/H6QqIxCFVFjNuChwYD
qdpf5SrLAgMBAAECggEBANK/pnwpV01hHPOEGDQjSZsuY1BL0a+hH/caIF/3RtK8
ywE3/NAGJYHJvQhtG4z3NidbnEk1aKyIGAKtihn0Kv20ofbRkivRLoqbTpfMC/dg
PQtJwKg9xdk39yBE+fQwy841aYQg813I9n3O+/db/4R/uhjdbGJVCaz4lGvbYJyv
MPJ2GcVTpGtUV/S5I5X9a3pnFPc3z1Vj7wd0+2zfViieCW4vfgthd3IAvzRt+xBA
x1J4Yz+OcDNTe15m9yQSJuUxlPWWdWk4K9KUW6k4LZnKCpZersDsI0FPJZOpzP1X
ZwFiuJD9m4xUfHf9EY5qrHtD2tYQOhM0OroLrSBLkAECgYEA9ZEdaJceu1t7hN1h
aKmu/TwEWKjXXP56SaW0Df+wwn+If7k4WvjfrAr9TZ4J940rioKqRrHehjvoy2ZH
/iDpSyYEPnG2ck3iDdJL45d4++ECgYEA65RzD8r7yVZbiS4Yj1/fwf+rYNT4Zy9H
DJMO30AXYuK+FXDc4X8sr4TWjb1Q1i0lEKq0vCRf9gXcfqBrR5IB/mnzYlI9rtJw
LLddTvoEAKE1u/aHqtyNerNWb5sG8jJHrnanRM8RHCR65cfxp6vLSb/BhFtMBd++
G+tgNmXOXCsCgYBeJ43HFGpMG/94Kgm3P5hAsEpaVCJ/HXN12Xr4Axma+Zs0nafl
+ZaJOI12vSnFKPOQ4Bi5kmlnvoC7vDO841XCMmjIS/KkTG91FORpm0GCg0YLNGwb
dG+/lJnw2hPTXL52gWG7lw5xLsxRVUx629OXZLQr3R2/Je2Orxs54FIbAQKBgFMX
zW3ont7pQugkBi2sF3SKBZzmAagDmP/qbvh31sfeSkWtxXsULGLMbBEakYS577Tt
QUqLWf2hG6DeXHimG2XtYRdxAqjDOSXMl3Df5sGCGz3tOvUdThnVX8uF1vFeosH6
wA0ZLGPMyjx6RdZqVg3xQQS6XxpDTP70Cr+lMSB5AoGBAIMbq3zYB/l2GKZ3KOS2
c1DR1kjObGROK4/s3V5nsLqXMUZSfV7kqgv4s6hWzy3I9xpQfcb7rZk7A/Rj/lc/
aDOmN5kUoVLwwqhsbF3D9D0RPT5rD2y4EDR3DyxjYJq4n3KRdhi6kB1HM9Jke9yF
hCJhTCoQbxjwX7LGJA5Umdi/
-----END PRIVATE KEY-----
Be careful with it: anyone with it will be able to access to your cloud service, here I obfuscated mine of course. There was an excellent presentation at POUG about Provilege Escalation in the Cloud from Pieter Van Puymbroek (@vanpupi) where he explains that showing this private key is like giving the key of your datacenter to someone with a laptop and a serial cable. Your cloud services have password authentication for login, but they have also a console.
From the generated private key I generate the public key:
root@Franck:~# openssl rsa -pubout -in ~/.oci/oci_api_key.pem -out ~/.oci/oci_api_key_public.pem
writing RSA key

root@Franck:~# cat ~/.oci/oci_api_key_public.pem
-----BEGIN PUBLIC KEY-----
MIIBIjANBgkqhkiG9w0BAQEFAAOCAQ8AMIIBCgKCAQEA4fqcQ1mdUGMXrQn3qFMX
DAd/3EbpMhKPyHx6v370yIaxLmMszM/5EEganULl+RvkP9+UZJkBNuOat6VywyR6
LW9g8+KM/XeqmraoBXkLzyEw+EEwdfDp2NqKJ2OPpy6klh7K5YFwUCKqP43Hdx7J
/Mezb+F2e5U6LZSDPD8MB5RMg0gk/xxNM41Z8dBjDsn+utNw+SyLIvq4g7OoxFEj
im+JsFpQSLuuvitzkjqRI2DJ5pnxHGql0GVADHkD4ZtC7dKyOfFlncAGDw1Go4lK
BM1jpJxi27jsznJuYrbX5MvYk+6PkyimmKlVLtvx+kKiMQhVRYzbgocGA6naX+Uq
ywIDAQAB
-----END PUBLIC KEY-----
This one can be shared publicly. The only thing you can do with it is to give me access to your system.
Upload public key
Before being able to do everything remotely from command line, I have to upload the key and get a fey identifiers from the Web portal. I'm going to my OCI console, from one of the regions I have access to (here EU-Frankfurt-1): https://console.eu-frankfurt-1.oraclecloud.com/a/identity/users
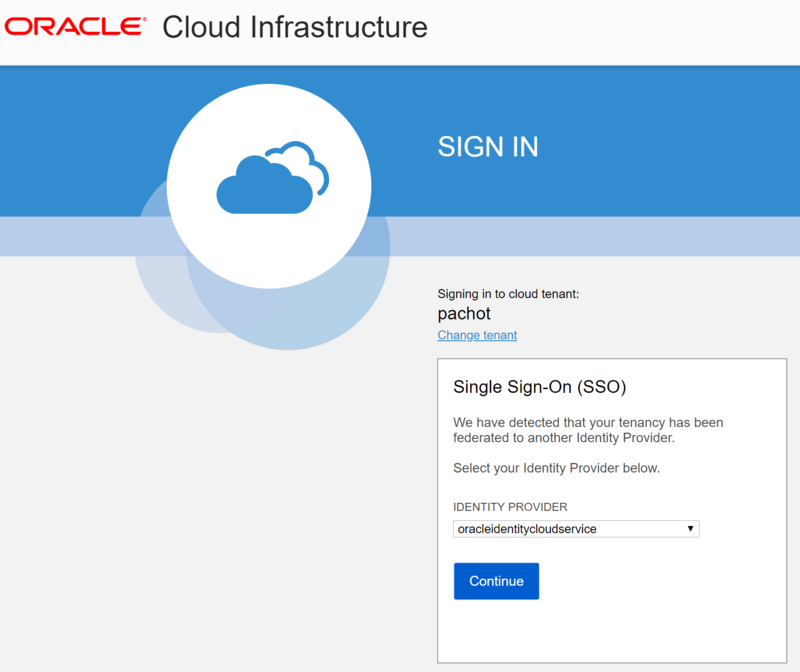
In the SSO login screen, I verify, or change, the "cloud tenant". The tenancy identifies yourself, or your company, which subscribed to the Oracle Cloud. Here is my login screen (where the tenant is my name):
I open the menu on top left, down to "Governance and Administration", open the "Identity" and "Users". The direct URL to it is: https://console.eu-frankfurt-1.oraclecloud.com/a/identity/users
From this list of users, I click on the user I'll use to sign-in through the REST API. In the Resources, I go to "API Keys" and "Add Public Key". This is where I paste the public key copied from above. This allows me to connect to my cloud service, as long as I have read access to the private key which was used to generate this public key.
Here is my user and list of keys:
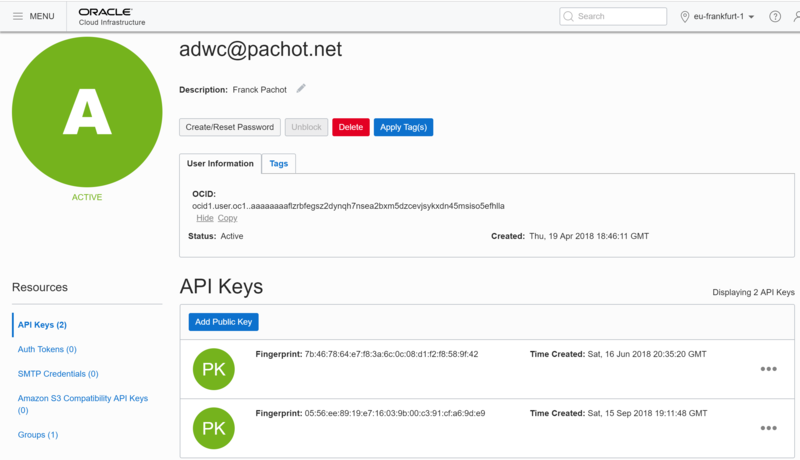
User OCID
I'll need the OCID for my user. Here it is fully displayed after I clicked on "Show". I click on "Copy" to get it in the clipboard. I set it as an environment variable in the shell I'll use later for REST API calls:
authUserId=ocid1.user.oc1..aaaaaaaaflzrbfegsz2dynqh7nsea2bxm5dzcevjsykxdn45msiso5efhlla
Key fingerprint
And the REST API sign-on will also identify the key I've uploaded, with its fingerprint, which I also set in my environment:
The key is identified by its fingerprint, displayed once I've added the public key:
keyFingerprint="05:56:ee:89:19:e7:16:03:9b:00:c3:91:cf:a6:9d:e9"
With the authUserId and keyFingerprint I can identify myself as long as I also have my private key. I set the path to this private key also in my environment:
privateKeyPath=~/.oci/oci_api_key.pem
Tenant OCID
The users, as well as the services, are all related to a Tenant (the one I selected in the SSO login page) and I'll need to identify it with an OCID.
I open the menu on top left, down to "Governance and Administration", open the "Administration" and then "Tenancy Details". I can also get there when choosing a Region on the top-right because the regions I can access are related to my tenant. The direct url is: https://console.eu-frankfurt-1.oraclecloud.com/a/tenancy/regions
Here again, you can "Show" and "Copy" the OCID. Without clicking on "Show", only the last digits are displayed:
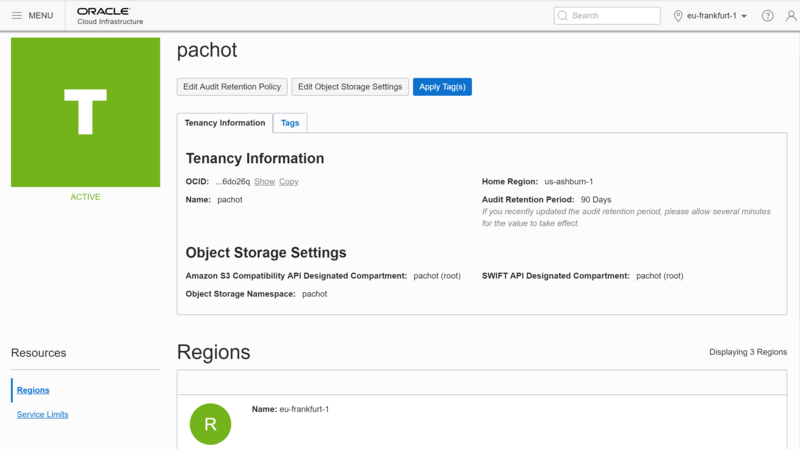
Again, I set it as an environement variable for later usage:
tenancyId=ocid1.tenancy.oc1..aaaaaaaac6guna6l6lpy2s6cm3kguijf4ivkgy5m4c4cngczztunig6do26q
Compartment OCID
One more identifier is required. All services are segregated into compartments within the tenant, for access security reasons. By default the services will be created in the tenant root, which is the default compartment. This is not a good idea for security reasons: you must disign your compartments to isolate the resources. However, for this test, I'll use the tenant root compartment and you can see that its OCID is the same as the tenant OCID:
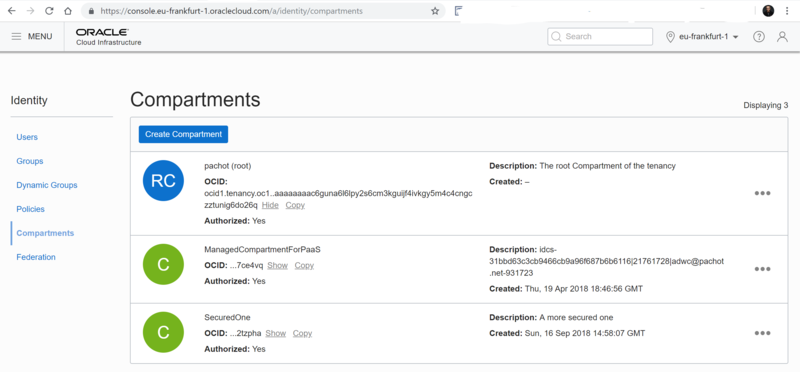
I'm setting this information in my environment and now I have everything to be able to connect to the services in this container:
compartmentId=ocid1.tenancy.oc1..aaaaaaaac6guna6l6lpy2s6cm3kguijf4ivkgy5m4c4cngczztunig6do26q
Testing with OCI-CURL
In order to quickly test if everything works well, I'll use the oci-curl function explained by Yasin Baskan, Product Manager of Autonomous Data Warehouse cloud service in https://blogs.oracle.com/datawarehousing/managing-autonomous-data-warehouse-using-oci-curl where the idea is to use the sample function from the documentation. This script example creates a bash function, named "oci-curl", which is doing all the sign-in steps (build the headers that must change every 5 minutes). The example is referenced in the documentation for OCI sign-in and is fully available at https://docs.cloud.oracle.com/iaas/Content/Resources/Assets/signing_sample_bash.txt.
What I am doing here is get it from internet (with curl), remove the UTF-8 Byte Order Mark "M-oM-;M-?" from first line (which I got when doing that from Windows WSL), and remove the lines which define the tenant and user OCIDs and other variables for private key location and public key fingerprint. When setting the environment variables above, I used the same names on purpose, so that I just have to remove the local declaration from the example.
Here, I directly source the output into my current bash process:
source <( \
 curl https://docs.cloud.oracle.com/iaas/Content/Resources/Assets/signing_sample_bash.txt     \
  | grep -vE "(local tenancyId|local authUserId=|local keyFingerprint|local privateKeyPath=)" \
  | sed -e '1s/^.*#/#/'
 )
Of course, this is for demo purpose only, on a lab. You should never run a script directly downloaded from internet without looking at it. Even if you trust oracle.com, are you sure that the DNS entry is correct?
This has created an oci-curl() function in my current shell which takes the endpoint, the method, and the request as arguments. The result is JSON, and then I pipe the result to JQ to have it nicely displayed. Note that within the Windows WSL, which runs Ubuntu 18.04, I had to install it with "add-apt-repository universe ; apt update ; apt install jq"
The next blog post will detail how to use the REST API with this oci-cutl() function. For the moment, I'll just list the services from my Autonomous Data Warehouse (/autonomousDataWarehouses) and Autonomous Transaction Processing (/autonomousDatabases) services (using the Compartment OCID I've set previously):
oci-curl database.us-ashburn-1.oraclecloud.com get "/20160918/autonomousDataWarehouses?compartmentId=$compartmentId" | jq
oci-curl database.us-ashburn-1.oraclecloud.com get "/20160918/autonomousDatabases?compartmentId=$compartmentId" | jq
The result, which validates that all the sign-in stuff is ok:
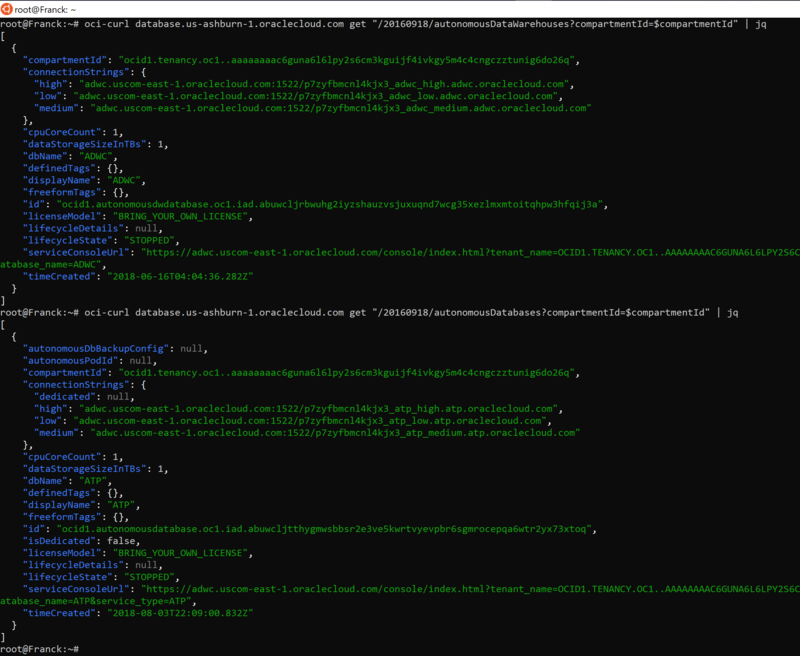
My services are named ADWC and ATP and are both stopped here. All information is available. The next post will show how to automate the start/stop of the services.
The comments are closed on this post, but do not hesitate to give feedback, comment or questions on Twitter (@FranckPachot)